|

In
March 2006, the Gyrodyne
Helicopter Historical Foundation (GHHF) received a limited number of excess
MK-64 Suspension Bands by the Naval Undersea Warfare Center. The bands were
the one final missing part to a national QH-50 display the GHHF had been
working on for over 6 years.
While the MK-64's component history to the Drone
Anti-Submarine Helicopter's (DASH) Airborne-Drop Weapon System is
significant, it was stunning to find out that of over 3000 remaining MK-44
torpedoes (removed from U.S. use in 1978)
being demil'd and scrapped, only enough MK-64 bands for 6 units survived to
2006 before they too were transferred to the demil account for scrapping.
 By the time the GHHF received the bands for
installation on our previously acquired MK-44 Torpedoes, the installation
protocols of the bands had been deleted from the Navy's OP 1207 Manual. So,
working together with active and retired members of the Naval Undersea
Warfare Center, the GHHF created the following protocol for installing these
historic bands to the MK-44 Torpedo. By the time the GHHF received the bands for
installation on our previously acquired MK-44 Torpedoes, the installation
protocols of the bands had been deleted from the Navy's OP 1207 Manual. So,
working together with active and retired members of the Naval Undersea
Warfare Center, the GHHF created the following protocol for installing these
historic bands to the MK-44 Torpedo.
|
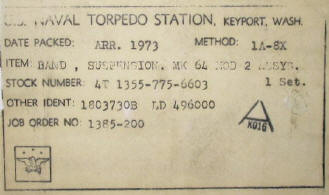
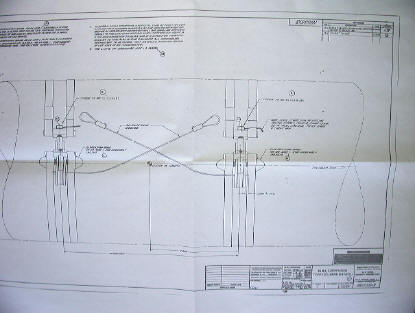
While it would be prudent to look over the
installation instructions for the MK-64s from the NAVY, such instructions
appear to have been deleted for the last 10 years. The only authentic
documentation the Gyrodyne Foundation had to work with, were de-classified
prints as seen at right, when it appeared that making new bands from the
prints would be the only solution. However, the prints to all the parts
became an invaluable resource, alone, for the proper installation to the
MK-44 Torpedo along with the pull-wire installation to the QH-50 AN46/47 eye
bolts; a installation covered no where in the DASH Manuals. Copies of these
prints are now part of Gyrodyne Foundation Archives for the QH-50 DASH
weapon system. IF you are performing any work
on your MK-64 bands, please review all the contents of this page before
doing anything OR you could get hurt!
|
 |
|
|
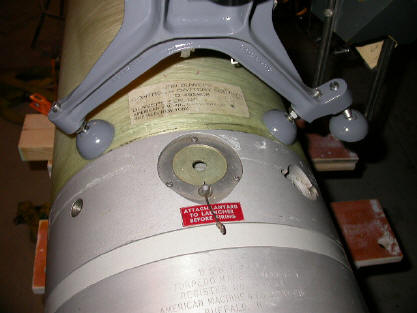
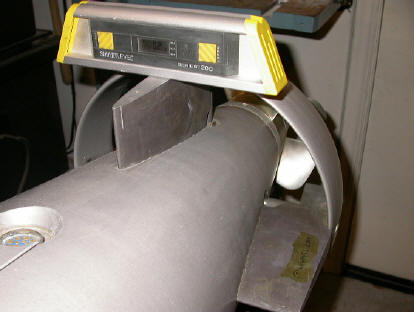
STEP ONE Let's begin our MK-64 Band installation. At left is the aft
section of a MK-44 torpedo, looking forward. Shown is the back side of the
aft-sway brace of the QH-50 helicopter. As the Gyrodyne Foundation MK-44
Torpedoes are "Exercise Units" without the MK 101 warhead sections
(we have one of those on the destroyer, USS J.P.
KENNEDY JR. (DD-850) if you want to see that unit), our torpedoes
are naturally 12" shorter and need to be moved FORWARD due to a shift in the
Center of Gravity of the torpedo. Having the sway brace pads meet where the
fiberglass body and Aluminum after-body meet, per photo, still allows for
the "Arming Lanyard" (pin at the red sticker) to still be attached to the
QH-50's arming solenoid.
|
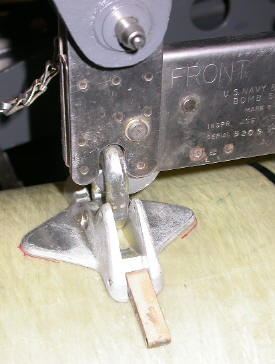
STEP TWO
Next, take a MK-64 Band and remove the Saddle-plate/ lug
assembly by unscrewing the socket-head screw. Note the safety wire in the
screw head: keep that piece of safety wire in the screw as you'll need it
later!
|
 |
|
 |
STEP THREE Next, the MK-44 torpedo must be supported under the QH-50
using a short table or stand to allow the Sway braces to rest on the MK-44
without a load, per above placement in STEP ONE.
Next, you need to level the MK-44 Torpedo to the
leveled-QH-50 fuselage so the weapon hangs correctly. The Mk-44 Shop uses a
digital level, as seen at left......accurate to a tenth of a degree! Remember,
the Mk-44's LONG FIN, is at the BOTTOM so don't install your weapon upside
down. Our Torpedo Mates suffer from making that mistake, without any mercy
from our Master Chiefs! Once you are all level, continue to the next
step. Remember the sway brace pads are adjustable, but clearance needs to be
kept for the MK-8 BRU latches to move freely......
|
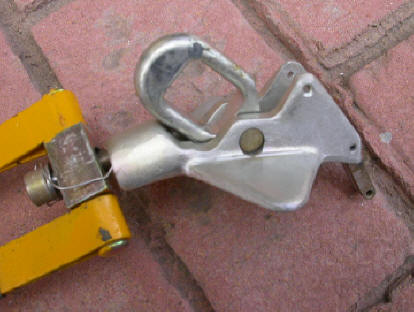
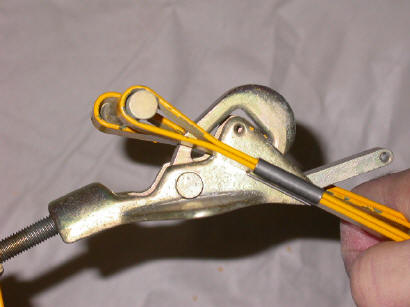
STEP FOUR Now, pickup that MK-64
Saddle-plate/ lug assembly you removed earlier, and position it as shown.
The brown-color-type lever, that is hanging down from the MK-64 lug assembly
at right, is
called a "Pawl". The Pawl MUST be on the "outside edge" of the MK-44 torpedo
so the release-wires can be properly installed later to the eye
bolts. Have the
"latch" of the MK-8 Bomb Release Unit engage the "Lug" of the MK-64 while both QH-50 and Mk-44
Torpedo are in a
level state (to familiarize your self with the
MK-8 BRU
please see
that page for that
unit!). Now, with all things level. Draw an outline of the Saddle Plate
with a permanent fine-point marker so you remember this placement.
This is VERY important! Do not omit this step!!!
Remove the saddle plate and reconnect to the socket-head
screw, using only three turns!
|
 |
|
 |
STEP FIVE After you have
reconnected the saddle-plate to the socket-head screw, roll the bands a bit
by simulating them wrapping around the torpedo. This "rolling" allows for
easier installation. Beware, however.......if the band comes loose while you
are doing this, you can get hit in the shins or worse as the steel band is
very stiff. Again, be careful! Try keeping your foot on one end while
working the other with your foot. Try to work a slight inward curve into the
bands.
Now, place the MK-64 band on the MK-44 torpedo and place the
saddle-plate near where you made your prior mark in STEP FOUR. Set the lug
and pawl to lay down as seen at left.
|
STEP SIX Now here is where it gets
tricky. The MK-64 loading tool is no longer available, so you'll have to do
the following by hand and have a helper near by.
As seen at right, the band-end has a latch that must GO UP
and OVER the LUG. You can practice this OFF the TORPEDO FIRST, so you can
see how this works. Once you have the "Latch-end" over the lug, have a
helper flip the LUG up. This should lock the band, but OFF the TORPEDO it
WILL NOT. The band needs to be in tension to lock properly.
|
 |
|
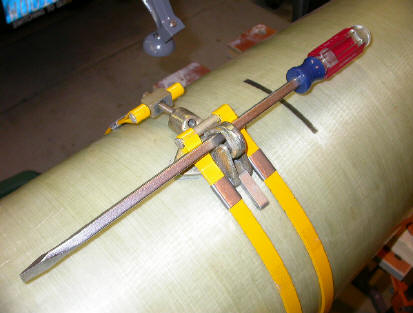 |
STEP SEVEN Once you feel
comfortable with the procedure, place the saddle plate near your mark on the
MK-44 and work the latch end over the Lug. It might help to have your
table-support directly under the band to at least keep the band tight on the
torpedo there.
Have your helper flip the lug up just enough to slip a long screw driver
through it to "safe" the band from releasing. Now, while the band is
still in this "loose" position, re-set the plate to where it out to be per
your mark on the Torpedo and begin to tighten with a 7/32" Allen Wrench-just
a couple turns.
|
STEP EIGHT With the band still
with some slack, work the screw driver in the lug to get the lug to stand up
and allow the PAWL to flip up into alignment so the .063 Release Wire can
feed through the saddle plate and pawl. For a QH-50 installation, you can
feed 2 feet through the pawl.
Now for WIRE ORIENTATION: the forward MK-64 band should have the
loop-end of the release wire heading aft and the aft MK-64 band should have
the loop-end of the release wire heading forward. As seen at right,
the Forward band with its release wire.
|
 |
|
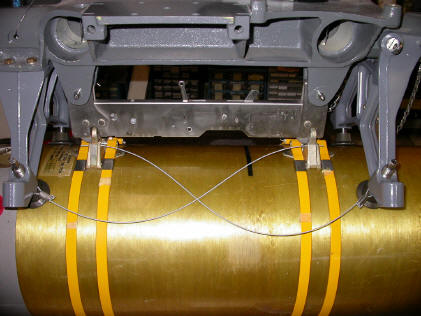 |
Step Nine REPEAT STEPS
One through EIGHT for the Other band. Keep both bands slightly loose enough
to set the Release Wire length to the SCREW that is above the Sway brace pad of the QH-50, as
seen at left; about 20.1 inches from loop end to .50 inch outside the PAWL. Once the proper length is
set, tighten down the
socket-head screw and safety-wire the bolt head to a side of the band. With
the correct length of the release wire set, you can cut the excess
music wire off the band, but leave about one inch outside the saddle plate /
pawl assembly. With the bands tight, connect the MK-64/MK-44 Torpedo to the
MK-8 Bomb Release unit and lock the BRU to the MK-64. Put a 1/4" bolt
(AN4-11) into
the MK-8 per those instructions to safe the BRU. Secure the Release Wires to
the QH-50's pads and you are Finished.
|
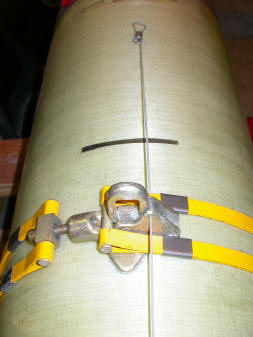
FOR MUSEUM USE ONLY: As seen at
right, before installing any MK-44/MK-64 assembly onto any aircraft for
display at a museum, the band must be made "safe" prior to installation.
Run a double line of .032 stainless steel safety wire from one end
of the band through to the other side and twist
(You can see the wires on the torpedo at right). Repeat for the
second band. This will prevent inadvertent release of the bands which
could cause serious injury if they release
after being dropped from an "unsafe" Mk-8 BRU.
|
 |
|
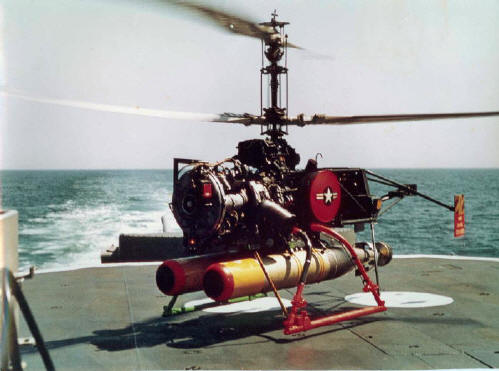
With everything installed correctly, let's go hunt some Subs!
|

The Gyrodyne Foundation wishes to
recognize the talented Torpedomen and ASROC-men, of the Naval Undersea Warfare
Center (NUWC) at Keyport, Washington and the NUWC-detachment at the Hawthorne
Army Depot (HWAD). Being readily available to answer our questions concerning
the authentic restoration and installation of the Mk-44 Torpedo to our QH-50s,
despite such protocols now lost from OP 1207, these people, both retired and
active-duty, have been an incredible resource and because of that, this area of
our web site, is DEDICATED TO THEM ALL !

|